Sunday, December 31, 2017

Getting ready for Spring in the garden

Hi everyone, Heather here today,  I hope you all had a fantastic Christmas, and that you have a very happy and prosperous New Year. Talking about New Year it will soon be time to start thinking about sorting out the garden. I don't know about you but my garden always looks miserable just before Spring, I start looking for the snowdrops to appear, then all the yellow flowers like crocuses, daffodils and primroses, then I know that Spring is around the corner and my garden will brighten up. I thought that I would make a card to remind me that I need to get started in the garden so that it will begin to look better ready for Spring and Summer. Below are just some of the items that I used from my Gslcuts stash, which is nowhere near the thousands of products that are on the store. Go and have a look yourself, you will be amazed at all the items you can find to enable you to make your own artwork. Sorry I had put gesso on the wheelbarrow and some of the Ivy before I remembered that I had to take a photo, so this is a before and after picture. The wheelbarrow I coloured with Creative expressions gilding polish as I did with the Ivy.


The stackable flowers and the picket fence I decided to cover in paper  so I glued the paper onto the shape then cut round it.( I used small scissors but a sharp craft knife is just as good)purely because they are easy to cut out and cover, and it makes the item a bit more interesting, the little tree  I had already painted with Gesso then  coloured that with creative expressions gilding polish


I found this lovely Bo Bunny paper on my stash of digital papers it is from the Bo Bunny Country garden collection, and is packets of seeds, which I thought was appropriate


Below is a picture of the tree, flowers and some rose leaves that were in my GSL box that I thought would look good as well. The rose leaves were also painted with Gesso and covered in Gilding polish


The flowers are just covered in different patterned paper, stacked together with glue in the middle then a brad put through all the layers which also helps to keep them together.
Now you need inspiration as to how to put the articles you have chosen together to form your project
Here is a picture of mine before deciding where to put everything.

My finished project will be on a later blog post, { January 30th. to be precise)so keep checking if you would like to see what I have done and in the mean time how about making your own and seeing how it differs from mine.
Go onto the store and have a look for more relevant items as well that can be added to your project, there are plenty there. I would like to wish everyone a very happy and prosperous New Year, hope everything goes well for you and your families.

GSL items used:
.


Saturday, December 30, 2017

SNOW Banner

Here is a quick and easy wall piece that I will hang from December through February.  I love Winter pieces that don't have to come down just because the holidays are over.  This Snow Banner is perfect for a wall or over a doorway.
First I painted my letters and snowflakes with a silver acrylic paint pen. 
Next I covered them with Glamour Dust.  This paint is wonderful, lots of sparkle and it never flakes.
For the cuffs of my mittens I painted them white with an acrylic paint pen.
I then covered them in a coat of Snow-Tex to give a nice texture.
I traced my mittens onto patterned paper and cut them out.  I glued them to the chipboard using Scotch Quick Dry glue.
Using a snowflake edge punch I made a large rosette for each mitten.


I painted some small accent snowflakes in blue and added them to each mitten.
I layered the mittens with a cardstock doily, rosette and letter.  I threaded a ribbon through the holes in the mittens and alternated with a large snowflake.


GSL products used:
SNOW Mitten Banner

Friday, December 29, 2017

Night Angel Triptych

This month I've created a set of three mixed media angels. A dreamy mystical triptych.


With New Year looming I thought it was a perfect time to think of dreaming and making wishes. That's what this set is all about. Looking up and forward and making bedtime wishes listened to by Night Angels.


Each of the three elements is made using a Cross Top Triptych piece. One of the thing I really appreciate about these elements is that the front piece is made up of straight edges, making it easy to embellish with scrapbook paper.


Each of the three seperate pieces is a slightly different size, but all fit nicely on Gypsy Soul ATC Stands. This makes displaying your pieces soooo simple. AND those little stands come in a set of three  so they're perfectly matched. (AND they're pretty dang reasonable too!)


While putting these pieces together is so simple, I have a little walkthrough of the process of making them. Hop over HERE for the video.


Below are all the bits I used to create my pieces, but you should absolutely feel free to add your own special touch to create your own dreamy night angels.


Cross Top Triptych
ATC Stands

decorative scrapbook papers
acrylic paint

Thursday, December 28, 2017

Belated Christmas Card

Hi everyone.  I hope you all had a very Merry Christmas with family and friends.  However, what do you do when you get a Christmas card from someone after Christmas?  Do you send them one back, or just wait until next year?  Whatever you decide, it is never too late, or too early, to make a card for someone special at Christmas.  So, this is an easy one but looks like a million bucks.  Okay, that's just my opinion, but I hope you agree.


Choose an image from the Vintage Christmas collection and an appropriately sized frame from GSL.  The Flourished Frame Karen works quite nicely for this image.


Trim your image to fit inside the frame opening, then paint frame with pearl nail polish and let dry.


Use your finger to dab the Stickles lime green glitter glue for a delicate application and let dry.


Turn frame over and dab glue over frame, again using finger to apply a light coat.  Lay frame over image and adhere both to front of card, as shown.


Make a couple of rosettes and follow directions that come with the die.


Paint Memories word ribbon and several different sizes of snowflakes with the pearl nail polish and let dry.


Use the flat end of a makeup sponge to dab Romance red paint over the top of the Memories word band.  Add crystal Stickles glitter glue to top of each snowflake for extra sparkle, and edge rosettes with pine needles distress ink.


Adhere all pieces to card front, as shown, and lifting some  of the pieces with foam dots.


Supplies Used:
GSL  Flourished Frame Karen
GSL Word Ribbons 1
GSL Snowflake Shape Set
Vintage Christmas Paper Collection (Authentique)
Olive Green card stock (for 5"x7" folded card)
Rosettes die  (Sizzix/Tim Holtz)
Tokyo Pearl Nail Polish (any pearl nail polish would work)
Romance chalk paint (DecoArt)
Lime Green, Crystal Stickles (Ranger)
Pine Needles Distress Ink (Tim Holtz)
Peace metal embellishment

I hope you enjoyed this super quick but oh-so-beautiful Christmas card.  You can make beautiful cards so easily just by choosing an appropriate laser cut frame from Gypsy Soul, and there are so many to choose from, too.  They add dimension without adding bulk, so they go through the mail without extra postage.  Of course, if you add lots more embellishments like the rosettes on my card above, you might want to box it up or hand deliver it.  Of course, if I am sending a gift, this is the perfect card to add inside the box, and yep, no extra postage there either.

Thanks so much for stopping by, and I just want to wish you all a very Happy New Year!!!

Barbara

Wednesday, December 27, 2017

Valentine card

Hope your Christmas was full of blessings!  Cherry here at the Gypsy Soul Laser Cuts blog today.
Is it too soon to be thinking Valentines?  Not for me.

I have an easy card to share.   I covered the cardstock in one solid piece of pattern paper and layered it with this Deco Lattice Panel 1 painted with red paint.


 Than I simply wrapped with ribbons and tied a bow and added stamens.


After that I added my main image and surrounded it with flowers, more stamens, and these Victorian Corners 1 colored with a glitter marker.


Thanks for always visiting the GSLC blog, cherry

GSLC Supplies-

Tuesday, December 26, 2017

Shabby Chic Christmas Brush Tree Shrines

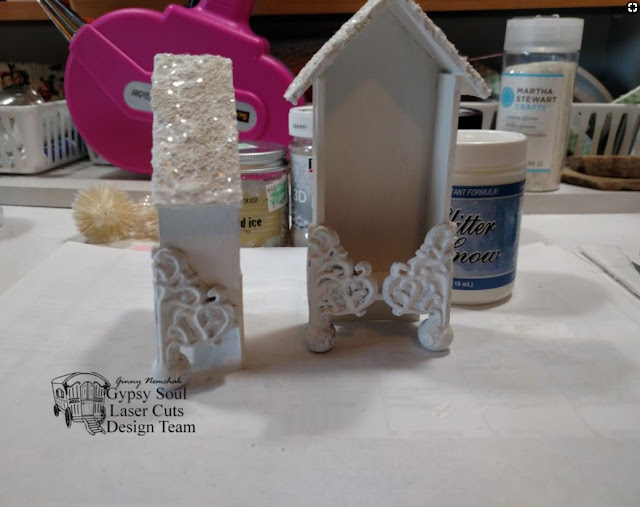
Hey there all you Gypsy Soul Peeps! Well Christmas Day has come and gone and I have had so much fun creating holiday decor with my GSL chippies. Today I'm sharing a set of very shabby and very sweet Christmas tree shrines. I reallyyyyyy love brush trees so I feel like they deserve to be displayed in a nice shrine.


 I mean are these not the cutest things????
I've even given them a bit of a snowy background.
And rooftops that are so sparkly and have a ton of texture.
I need to make like elebenty hundred of these to line up on my mantle!!!!!

Here's how I created them.....
I assembled the shrines and painted them with flat white acrylic. Two coats please : ) I really like Tombow Mono-Multi to adhere the pieces.

I've splodged on a fair bit of faux snow and tamped the brush in it to add stiff peaks.
Then carefully sprinkled on 3D powder.
Next add some glitter...everything is better with glitter.

These metal feet were given a coat of Gesso and a top coat of the white paint. You will look at this and say....but Ginny there's no room for the back feet and the shrine will tip over.
So I added a super sturdy chipboard back support to hold up the back. See how you don't really even notice it looking from the front.
Now it's stable and can be filled with just about anything that will fit. I recommend tiny brush trees : )

I also recommend making a lot of them as they were super fun to create and will look fabby with your favorite seasonal decor.

Gypsy Soul Laser Cuts~ Mini House Shadowbox 4, Mini House Shadowbox 2, Keys Engraved ( coming soon) Faux Metal Number Plates.

Monday, December 25, 2017

Winter mini canvas by Lynne

Merry Christmas! Wishing each and every one of you a wonderful, magical day! I've created a glittery, shimmer, magical scene on an 8x8 canvas using some really great chipboard pieces from the Gypsy Soul store.


I used Authentique paper from the Cozy collection for my background, tearing the edges so that it was just a smidge smaller than the canvas. I attached it with Mod Podge and podged the edges to keep then from curling or lifting. Homemade texture paste was added using a Prima stencil.

The tree and snowflakes were primed with white acrylic paint and the deer with tan.


I used texture paste on the surface of the tree to create the feel of snow layered atop branches, then when that was dry I brushed Mod Podge lightly here and there and sprinkled on some clear glass glitter. After allowing that to dry, I misted with Tattered Angels glimmer mist in Olive Vine (one of my favourite shades) The mist took on a slightly darker shade where the Mod Podge was, resulting in a nice variation in the colour.


I brushed the snowflakes with Mod Podge and sprinkled them with glass glitter as well, and brushed the reindeer with white Perfect Pearls to soften the colour and add a subtle sheen, then added a little glass glitter to their backs as well.


The snow was created with Mod Podge and cheesecloth; I just kind of mooshed the cloth into the podge and then added glass glitter....hmmm, a bit of a pattern here-Mod Podge and glass glitter n everything, everywhere!!! When it was dry, the cheesecloth was stiff and held the shape of the "snowbanks" I had created.


You may know that I love squirrels, so I decided my outdoor scene needed a couple of these little cuties-they were cut with a Memory Box die and lightly inked in dark grey.


I glued the tree and snowflakes down and popped up the deer with foam tape for dimension, and added a sentiment to the top, also popped up with foam tape.

Thanks so much for stopping by and checking out my winter creation!

GYPSY SOUL ITEMS USED


OTHER ITEMS USED

Authentique paper-Flurries
Memory Box die-squirrels
clear glass glitter
Mod Podge
Tattered Angels glimmer mist-Olive Vine
Perfect Pearls powder
Prima stencil